

 Previous
LEAVE A REPLY
Your email address will not be published.Required fields are marked *

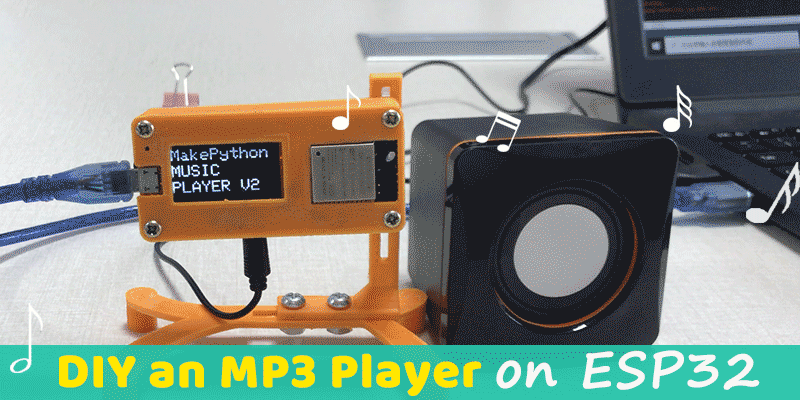
In this project, we will learn how to build a DIY MP3 player with ESP32, using the ESP32 Audio module, we can make an MP3 player with extra web radio and alarm clock function.
ESP32 can be used as an independent system to run applications, just plug in the cable, power the device, and program it. With downloading different programs, the player can realize SD card playing music function, Internet radio function, and music alarm clock function.
Now, let's start!
1. Supplies:
1.1 Hardware:
• MakePython ESP32 (WROVER, you can get it from this link: https://www.makerfabs.com/makepython-esp32.html
• MakePython Audio (you can get it from this link: https://www.makerfabs.com/makepython-audio.html
• Micro SD card
• USB cable
• Audio/headphones with 3.5mm audio connector
1.2 Software:
• Arduino IDE
• Download music (.mp3 or .wav) to the SD card.
2. Hardware Connection

Connect two boards according to the pins. The VCC is connected to 3v3.
3. Programming Environment
3.1 ESP32 Support
Follow the Installation Instructions to add ESP32 support if you are not yet doing it: https://github.com/espressif/arduino-esp32
3.2 Install Library
• Adafruit SSD1306 and dependent libraries.
• ESP32-audioI2S.
You can get the zip file from the Github: https://github.com/Makerfabs/Project_MakePython_Audio_Music
Unzip this file. Open your Arduino IDE and navigate to Sketch > Include Library > Manage Libraries > Add .ZIP Library.
Then open the folder: "\Project_MakePython_Audio_Music\old-src\esp32_mp3\ESP32-audioI2S". And you will see a prompt that the library installed successfully.
4. About Code
4.1 Audio Play
• Open file "/Project_MakePython_Audio_Music/music_player.ino". You can get the code from Github: https://github.com/Makerfabs/Project_MakePython_Audio_Music
• Notice: MicroPython Audio can be downloaded without unplugging. When uploading the program, please rotate the switch next to the 3.5mm Audio interface to the Audio socket for downloading successfully.
• Modify or add text in the display.
| void lcd_text(String text) |
• Change the initial volume:
| audio.setPinout(I2S_BCLK, I2S_LRC, I2S_DOUT); audio.setVolume(14); // 0...21 |
• Switch songs:
| if (digitalRead(Pin_next) == 0) { Serial.println("Pin_next"); if (file_index < file_num - 1) file_index++; else file_index = 0; open_new_song(file_list[file_index]); print_song_time(); button_time = millis(); } if (digitalRead(Pin_previous) == 0) { Serial.println("Pin_previous"); if (file_index > 0) file_index--; else file_index = file_num - 1; open_new_song(file_list[file_index]); print_song_time(); button_time = millis(); } |
• Upload the code.
4.2 Web Radio
• You can get the code from the link: https://github.com/Makerfabs/Project_ESP32-Web-Radio
• Web radio needs to connect to the Internet, you need to change the WIFI information.
| const char *ssid = "Makerfabs"; const char *password = "20160704"; |
• Add, delete or modify the radio address in the following code:
| String stations[] = { "0n-80s.radionetz.de:8000/0n-70s.mp3", "mediaserv30.live-streams.nl:8000/stream", "www.surfmusic.de/m3u/100-5-das-hitradio,4529.m3u", "stream.1a-webradio.de/deutsch/mp3-128/vtuner-1a", "mp3.ffh.de/radioffh/hqlivestream.aac", // 128k aac "www.antenne.de/webradio/antenne.m3u", "listen.rusongs.ru/ru-mp3-128", "edge.audio.3qsdn.com/senderkw-mp3", "macslons-irish-pub-radio.com/media.asx"}; |
• Connect to the web radio station:
| void open_new_radio(String station) { audio.connecttohost(station); |
4.3 Alarm Clock
• You can get the code from here: https://github.com/Makerfabs/Project_Wakemaster-Alarm-Clock.
• Modify the alarm time in the following code:
| const char *ntpServer = "120.25.108.11"; const long gmtOffset_sec = 8 * 60 * 60; //China+8 const int daylightOffset_sec = 0; String clock_time = "17:39:00"; String clock_time2 = "17:42:00"; |
• Init and get the time,and the “gmtOffset” is used to set the time zone.
| //init and get the time configTime(gmtOffset_sec, daylightOffset_sec, ntpServer); Serial.println(F("Alread get npt time.")); |
• Modify the alarm clock music:
| void loop() { printLocalTime(); audio.loop(); if (millis() - button_time > 600) { if (alarm_flag == 0) { if (showtime() != 0) { open_new_song("clock.wav"); alarm_flag = 1; display.setCursor(0, 24); display.println("ALARM!!!!!"); display.display(); delay(1000); button_time = millis(); } } |
5. 3D Printed Case
The case can be obtained from: https://www.makerfabs.com/esp32-audio-fixture-kit.html
• 3D design:
Design the case as you like. If don’t want to design it temporarily, you can get the design file from here: https://github.com/Makerfabs/Project_MakePython_Audio_Music
• 3D printing:
Transfer your print files to the printer using an SD card. 3D printing can complete the production of the case quickly.
• Assembly
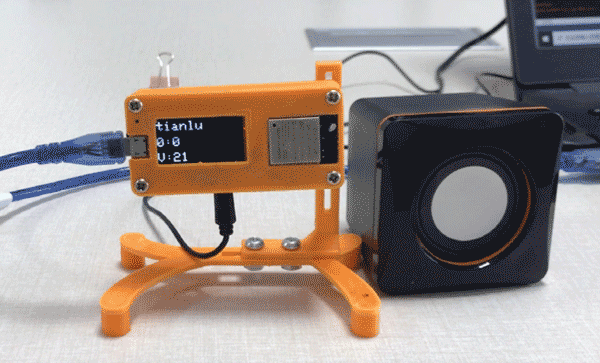
6: Operation
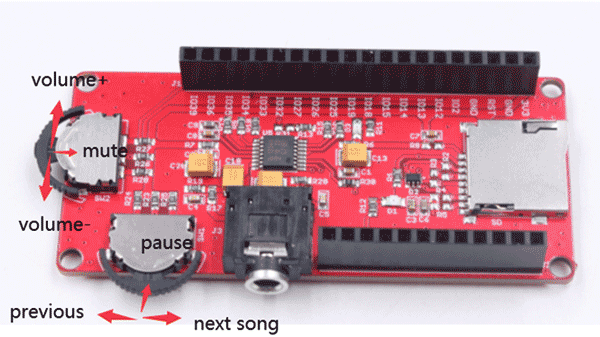
Power the ESP32 via Micro USB and the LCD screen displays the basic information of the song. The lower left switch can switch songs or radio channel, and press inward to pause playback. The switch on the left can increase or decrease the volume, press inward to mute or stop the alarm.
7. Video show:
Check this video to learn how we build the ESP32 MP3 Player.
If you have any further questions or need some PCBA customizations based on those MakePython IoT boards, feel free to contact us .


